Explore Different Microblading Techniques
Mircoblading Technique

Microblading is a technique where we create small cuts in the pattern of hairs with the desired color into the brows to create the illusion of fuller looking eyebrows. This technique is great for you if you already have eyebrow hairs but it is light and sparse. Your results will be very subtle and natural. This technique is not recommended for those who are missing more than 60% of brow density, oily skin, or those living an active lifestyle.


Soft Ombre Technique

This technique is one of our favorite because it is suitable for all clients. Soft Ombré Shading or Powder Brows is shading or filling the entire brow with the ombré shading effect where the tails are the darkest and the front of the brows is the lightest. It heals to a soft makeup look or we can make it softer to give just the illusion of shadows and dimensions when combined with existing hair.
This technique is great for oily skin type, those who desire a soft makeup finish when healed, wants the lowest maintenance possible, or are missing the arches and tails of the eyebrows. Great for those who have mature skin since shading causes the least amount of injury.


Combo Brows Technique

Combo Brows is a technique that is the most popular. It is the combination of Microblading hair strokes strategically placed where you desire the hair look plus we add shading to add depth and dimension for the most complete and natural look. This service is for you if you’ve over tweezed or have very minimal eyebrows but don’t want the statement look. Ideal for those with dry to normal skin.


Microshading Technique

Microshading is another version of the combo brows except this technique involves more shading than Microblading. We create Microblading hairstrokes to the front of the eyebrows, the rest of the eyebrows including the brow tails and arches are shaded in an ombré effect. This is for the babe who loves to look like she woke up with makeup on. Bold at first but will heal powdery, soft, and beautiful as if you’ve just perfectly penciled and blended in your brows. This technique is great for oily skin, those living an active lifestyle, who wants the lowest maintenance possible, and for clients with mature skin.


THINGS TO CONSIDER FOR MICROBLADING
The Process
Step 2
Before Booking
Now that you’re the right candidate. Select a technique. If you are unsure of which procedure might suit you best, we can make recommendations through the picture you provided. Or take the quiz! If you have had PMU done previously please do mention it in the text 781-808-1650.
Step 3
Response From Us
Once booked go to Before Care and make sure you follow the before care prior to coming in for your appointment. Also, please read the After Care instructions so that you can plan better for your after care. The results of the procedure will depend on how well you follow the before and after care.
Eyebrow Microblading Candidacy and Contraindication
- Those under 18 years of age
- Women who are pregnant or lactating
- People with glaucoma
- People taking blood thinners (must stop 4 weeks prior to procedure, please advise your doctor)
- People with skin diseases such as psoriasis, eczema and undiagnosed rashes or blisters on the site is to be treated
- People with allergies to makeup or pigments
- Those easily triggered post inflammatory hyper-pigmentation are not good candidates Those with transmitted low blood conditions like HIV or hepatitis Active skin cancer in the area to be tattooed
- If you are a hemophiliac
- Having healing disorders, uncontrolled blood pressure or had mitral valve disorder. Those on any skin medication such as Accutane or steroids- which thin and over sensitize the skin
- People who are anemic
- People prone to keloids

Microblading Experience
Step 1
Consultation
The consultation is important. Although you’ve read all of the contraindications before booking and followed the Before Care for you procedure, we will need to evaluate your skin type, allergies, and any medical conditions.
We’ll talk about your lifestyle, makeup, and eyebrow routine. We’ll discuss what your biggest struggle and what you love about your brows now and lastly, what style you would like them to look like after.
Step 2
Map & Color
After we learn your preferences, we’ll map out, draw, and measure your new brows using your facial features and bone structure so that your new brows fits naturally with your entire face. You’ll be asked to do ridiculous facial expressions (angry face, surprised look, you’ll fake laugh and then laugh for real) to ensure your expressions will look natural.
Eyebrow mapping is done by using various tools such as the Golden Ratio Method to measure 6 points on the brows. The rest of the hairs that is outside of the lining of your new brows will be removed by either threading, tweezing, or razor removal to lesson any pain to give you clean fresh looking brows.
Topical numbing cream will be applied for 20 full minutes, unless of course, you request to skip the process of numbing.
While we wait for the numbing cream to work, we will decide on the color together. Letting it dry and oxidize on your skin to ensure the best color.
We don’t start until you are completely happy with the shape of your new brows.
Step 3
Microblade
The practitioner will then remove numbing agent and carefully draw small hair like strokes within the shape with a manual pen comprised of a row mm sized needles, which makes the form of a “blade” (it is not actually a blade). With the new strokes, pigment is then deposited into the skin, under the epidermis of the skin. We call this the “first pass”.
One eyebrow will be microbladed at a time and followed by a “second pass”. The practitioner will perfect and add any extra strokes that’s needed before your brows are revealed to you. During the first step of microblading, (second step is the touch up) it is important to be conservative the first time. We can always go darker and bolder at the touch up! If you have opted for “Combination Brows” this is where we add shading to create shadows and dimension to match your natural hair density.
Step 4
The Reveal
Before the reveal, your newly microbladed brows will soak in pigment for about 8 minutes. After, Any excess pigment will be wiped away and your new eyebrows will be revealed!
No more stressful morning application trying to achieve shape, density and symmetry. No more stress of accidentally wiping your brows away. Go on and jump in that body of water, enjoy your life because we may still have 99 problems but your brows ain’t one!
Step 5
Slay
This part is the beginning of caring for your new brows by following the After Care to ensure proper healing. After the healing process, you get to go out and SLAY with your newly enhance brow game.
Sleep in a little longer. And when your partner asks you when you’ll be ready, you can give a more accurate time (we all know it takes more than 5 more minutes!) and strut with confidence knowing your brows will be appreciated by other brow queens.
Step 6
Touch-Up
Requiring a touch up depends on how well you follow the after care as well as your skin type. Remember it will take about 4 weeks for your brows to heal completely. If you are unsure about needing a touch up please send us a picture of your brows 4 weeks after the initial procedure to 781-808-1650. At this time, we will revaluate how you’ve healed and provide you next steps. In case you want to go darker or bolder and add more strokes where strokes have faded you should book a touch up appointment.
Until then, enjoy waking up with eyebrows.
Permanent Make Up Aftercare
Microblading after care is very important to the appearance and longevity of your new brows.
Always wash your hands with a disinfectant soap before touching the tattooed area!
Remember, this is now a wound, taking great care to not introduce bacteria to the area.
Step 1
The Day Of The Treatment: First 12 Hours
- With slight pressure blot the area with clean tissue to absorb any excess lymph fluid. This fluid is a clear like substance that may slightly build up on the brow area.
- You may or may not have lymph fluid during this time. If you do, remove it so it does not form into a thick dry crust. If you fail to remove the fluid, when it dries and falls off, it’ll take pigment with it, leaving you with less than optimal retention and results.
- Do this every few minutes until the lymph fluid stops secreting.
Step 2
Days 1-10: Wash AM/PM With Gentle Foaming Cleanser
- When you wake up, wash your face and brows gently to remove any bacteria and dead skin.
- Wash your face again at night before bed.
- Only wash your face outside of the shower.
- Wash in a gentle circular motion following your natural hair growth. Rinse well with warm (not hot) water.
- Pat dry with clean paper towel then allow air to also dry the brows.
Step 3
Days 1-10: Moisturize
- Allow brows to air dry for minimum of 5 minutes. The brows should be completely 100% dry prior to adding on ointment. Never put ointment on damp brows.
- Apply a very thin layer of ointment with a Q-Tip. Do not use your hands.
- The ointment should not leave a noticeable shine or film on the brows. You are only applying enough to moisturize.
Before Care for Best Microblading Retention
Now that you’re the ideal client, following the before care is crucial. Because we need healthy, healed, and calm skin.
Before Care is crucial for a safe and effective procedure.
Step 1
4 Weeks Before Procedure
- Please be mindful of acne cream treatment because this thins out and over sensitize the skin.
- We’ve learned that antibiotics has slowed down healing, understand that the healing process (approximately 2 weeks) can take longer if you’re on them (4 weeks +).
- No laser or chemical peels should be done 4 weeks of your procedure.
- No sunburns on your face. Ink will not stay.
- AHA (Alpha Hydroxy Acids) such as lactic, glycolic, citric, retinoid and tartaric acids or any Over the Counter creams and lotions for tone correcting anti-aging can cause premature fading. Expect to come in for more touch ups if this is the case.
Step 2
2 Weeks – 48 Hours Before Procedure
- No Botox 2 weeks before of after. Although, we prefer Botox treatments before Brow PMU treatment.
- No eyebrow tinting, this can confuse our pigment selection process.
- Skin irritation or big blemishes on your brows, please reschedule your appointment.
- If you are feeling sick, having cold or flu like symptoms, sinus/respiratory infection please reschedule your appointment
- Do not wax, tweeze, or thread eyebrows, we’ll groom them at the session.
- No alcohol 48 hours before. This thins out the blood and will lead to patchy healed results.
Step 3
24 Hours Before Procedure
- No caffeine or alcohol
- Understand that Aspirin and any blood thinners may cause extra bleeding leading to patchy uneven healed results.
- Wear glasses instead of contact lens if you’re getting eyeliner tattoo, but also the way we stretch the skin we could inadvertently put pressure on the eyeball which could move your lens around.
- Avoid working out or strenuous exercises as this increases blood flow.
- Avoid thermogenic and stimulates that elevates blood pressure and blood flow.
- During your menstrual cycle, you will be more sensitive.
- It’s important that you come in with how you normally do your brows everyday so we have an idea of your baseline and what you prefer.
Client Testimonials
ARE YOU READY?
Time to book an appointment
Frequently Asked Questions
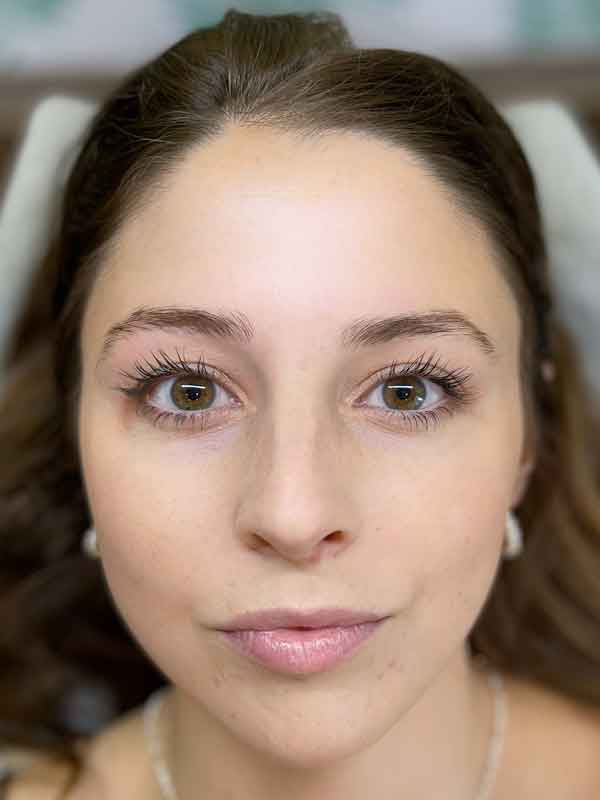
If you look at image below, you will see an example of what microblading looks like. They are individual tiny cuts into the skin that looks like hairstrokes. This art is very beautiful and super natural if you already evenly distributed hair throughout the brows. If you lack eyebrow hairs in, say the arch or tail of the brow, adding just microblading strokes without any shading will not look natural. “Natural” looking eyebrows have shading and dimensions and the only way to mimic natural eyebrows is to add some shading with a rotary pen (a delicate machine made specifically for cosmetic tattooing).
Shading is using a needle in a cartridge and a machine that inserts pigment with an in and out motion (consistent even poking) which creates less injury to the skin. We can make it look like small dots or pixelation, with a cluster of small dots, this creates shadows. The shadows helps in creating natural looking brows. We can add layers of shading to create various looks from soft shadows, to soft powder or a makeup look for the least maintenance possible.
Our artists here at Brow Lady Microblading have the shading technique in our own brows and we like to wear the least amount of makeup possible! So yes, shading can look natural!
We practice universal precautions. Our artists are required to get training annually to ensure our knowledge is up to date to keep the community safe.
After each client, the treatment room and beds are disinfected with Cavicide killing TB, MRSA, HIV-1, HBV, HCV, basically viruses, bacteria, fungus, and bloodborne pathogens.
Our artists work with nitrile gloves that are puncture resistant and FDA compliant. You won’t need to worry about latex allergies either since we don’t bother stocking our inventory with it!
Microblading tools and needles are all one time use. Pigments are proudly vegan friendly, FDA approved and are made in the USA.
Pain is subjective and varies from person to person. This is a cosmetic tattoo procedure which means that, YES, some parts can be painful. However, numbing cream gets used throughout the entire procedure to keep you as comfortable as possible. Most people say that tweezing hurts more than the tattoo part.
To limit your pain, please refrain from consuming caffeine the day of, avoid alcohol for 48 hours prior to your appointment time, and don’t use cannabis right before as this enhances your sensitivity to pain. Being on your menstrual cycle can also cause sensitivity.
Powder shading: Lasts 1-5 years, or indefinitely.
Microblading: Lasts 6 months-3 years
The longevity of your brows depend on the technique, skin type, skin care routine (exfoliating, enzyme facials, chemical peels, laser treatments, & products used), lifestyle (open water swimmer, marathon runner, exercise and perspiration vs. someone who is sedentary), how strictly you adhere to before and aftercare, medication, hormones, and sleep position.
All brow technique will fade 10-70% depending on various factors mentioned above. A touch up is recommended between1-1.5 years after the Perfecting Session (the touch up session after the initial procedure) to keep your brows lasting longer. Microblading isn’t a permanent solution due to the depth of pigment implantation, skin cell regeneration, and exposure to the elements (Rain and Sun!). Touch-ups are necessary to keep them looking fresh, colorful, and beautiful.
Of course! First we will take measurements according to your bone structure and facial features. We will draw the shape, reshape, review, and reshape again until you are completely satisfied with your shape. Drawing and measuring your brows take the longest. Each brow design will be customized to achieve the most natural look.
It depends on the technique you choose/need.
Microblading: 1.5 hours – 2 hours
Powder Only: 2.5-3 Hours
Combination of Both: 2.5 hours- 3 Hours
Perfecting Sessions & Touch Ups: 45 mins-1.5 hours
First time appointment: The entire appointment consists of a consultation, taking before pictures, brow mapping (longest part of appointment), numbing, actual tattoo process, remapping to ensure symmetry, finishing touches, taking after pictures, explaining after care instructions, and scheduling a Perfecting Session.
Touch Ups: Brow grooming, healed photos are taken, Numbing cream is applied depending on the technique, we remap your brows, make adjustments, begin the tattoo process, remap again, add finishing touches, take after pictures, and say our goodbyes until your next touch up. This is something you will schedule as needed.
Tattooing is an art that cannot and will not be rushed. Please plan accordingly. Eat and hydrate before your appointment. Unlike lash appointments, we are patient with bathroom breaks!
For optimal results, a touch up is recommended. Brow tattooing is a two-step, sometimes three-step process. At least two appointments are needed initially. Touch ups are done from no earlier than 4 weeks and no later than 8 weeks. It’s important to have your touch up done no later than 8 weeks, a touch up fee will occur.
At the touch up, we assess the color retention and make adjustments as necessary. Everyone heals differently and at different rates. It is expected that microblading and shading does not heal perfectly the first time. We can always adjust color, add more density, and correct any irregularities in the brows during the touch up.
To keep your brows looking great, we highly recommend coming back between 12- 18 months for a color boost.
Immediately after the procedure you might notice a white halo around the brow from the numbing cream.
You may experience the following symptoms for about 4 days.
– Minor swelling and redness -You may use an ice pack with a clean barrier between the skin and ice pack.
– Mild tenderness
– Itchiness in the eyebrow area- Witch Hazel helps!
– Dry flaking skin
These symptoms are a normal part of the healing process.
Remember, your selected color will be much darker and bolder and more sharply defined for the first 4 days after the procedure, but as the healing process occurs the color will soften and lighten (Day 5-14).
In the first few days, you’ll develop a scab. Some people scab in light flakes and some develop a thick scab. Your scabs should naturally flake off in about 14 days. Everybody is different, but whatever you do, do NOT pick at the scabs and make sure you read through and follow the AFTERCARE INSTRUCTIONS properly to obtain the best results.
If the scabbing phase is not over by 14 days, please continue your Aftercare instructions until scabs are completely gone.
After the scabbing phase is over, you will see that the color of your pigment appears foggy and muted in color because a layer of skin has grown over the pigment to seal it in. Not to worry, over the next several weeks your skin will regenerate and the pigment will be more vibrant in color. The complete healing process takes at least 4 weeks which is when the true orientation of the pigment will show.
For most people, the first 3 days is an “adjustment to your new brows” period. Time off from work is not needed. However, some people may feel uncomfortable with the way the treated area looks depending on the person.
Your microbladed brows or powder ombre shading brows will take approximately 10 days to heal. During that week, it is encouraged to let them naturally exfoliate off. This means keeping them out of water, sweat, steam, etc. Once the scabbing phase passes, the brows will appear lighter, and their true color should come out after 4 weeks. As long as you’re good at following aftercare instructions, there shouldn’t be a problem with going to work or being out in public.
We love that you’re prepared! View everything you need to know about Before Care here.
Your new brows are now considered a wound. To prevent infection and proper healing, do not wear any makeup on your brows for 2 weeks. Makeup everywhere else is okay.
The healing process and Microblading aftercare is by far one of the most important phases on your eyebrow tattooing journey.
For the first 24 hours, you must remove the lymph fluid that secretes from your brows. We’ll show you how to do this after your appointment.
You must avoid sun exposure to avoid premature pigment fade.
Avoid the use of glycolic acid since this acid helps regenerate new skin, this will also cause your brows to fade prematurely.
Click below to read the complete list of microblading aftercare.
Everything you need to know about After Care can be found here.
Yes, if the old tattoo is faded enough to not show through significantly over the new hair strokes. Please submit a picture of your bare brows to determine if your case can be taken to 781-808-1650.
Unfortunately, we do not touch up other artist’s work. You will be treated as a new client and the full price will be charged if we can accept your case.
Yes! Small training classes are offered and it is never too late to start! View Training here.